+852 46135220

In many routine water laboratories, calibration is performed every day, but not always understood correctly. The instrument may be calibrated because the procedure requires it, not because the user is actively checking whether the measurement system is still under control. This is where many water testing errors begin.
But calibration is not a formality. It is one of the most important steps that decides whether a water quality result can be trusted. Calibration in water quality testing is the process of comparing an instrument’s response with known standard solutions to confirm that the measurement result is reliable. It is not only a routine instrument setting. Proper calibration helps verify whether pH meters, conductivity meters, photometers and spectrophotometers are suitable for the sample, method, and testing decision. Without correct calibration, a stable reading may still produce inaccurate or misleading water quality data.
In routine water analysis, calibration is not just about the instrument. It is about the entire measurement system.
What Calibration Really Means
Calibration is the process of comparing an instrument’s response with a known reference standard. In simple terms, calibration answers this question: When the instrument gives a signal, what does that signal actually mean?
For example:
l When a pH meter shows pH 7.00, does it really match a pH 7.00 buffer?
l When a conductivity meter shows 1413 μS/cm, does it match the standard solution?
l When a photometer measures absorbance, does that absorbance correctly correspond to the concentration of the tested parameter?
l When a COD result is calculated, does the measured response match a valid calibration curve or verified method range?
Without calibration, the instrument may still display a number. But that number may not be connected accurately to the real value of the sample. That is why calibration is not only a technical operation. It is the link between instrument response and reliable water quality data.
Why Calibration Is So Important in Water Quality Testing
Water quality testing is affected by many factors:
l Instrument condition
l Electrode performance
l Reagent quality
l Sample matrix
l Temperature
l Operator technique
l Method range
l Cuvette cleanliness
l Standard solution accuracy
l Measurement environment
Calibration helps control part of this uncertainty. It does not remove every possible error, but it confirms whether the instrument is responding correctly under current testing conditions.
This is especially important because many routine water quality parameters are used for real decisions, such as:
u Whether treated wastewater meets discharge requirements
u Whether drinking water needs further treatment
u Whether a process tank is under control
u Whether aquaculture water needs adjustment
u Whether a laboratory result can be reported
u Whether a field measurement should trigger immediate action
If the calibration is wrong, every result after that can also be wrong.
Calibration Is Different from Simply Turning on the Instrument
One common misunderstanding is assuming that an instrument is ready as soon as it powers on successfully. But turning on an instrument only means the electronics are working. It does not prove that the measurement system is accurate.
For example, a pH meter can turn on normally while the electrode slope is poor. A photometer can display absorbance while the cuvette is dirty or the blank is incorrect. A conductivity meter can give a stable reading while the probe is contaminated or the wrong standard was used. The instrument may look normal. The reading may look stable. The result may even look reasonable.
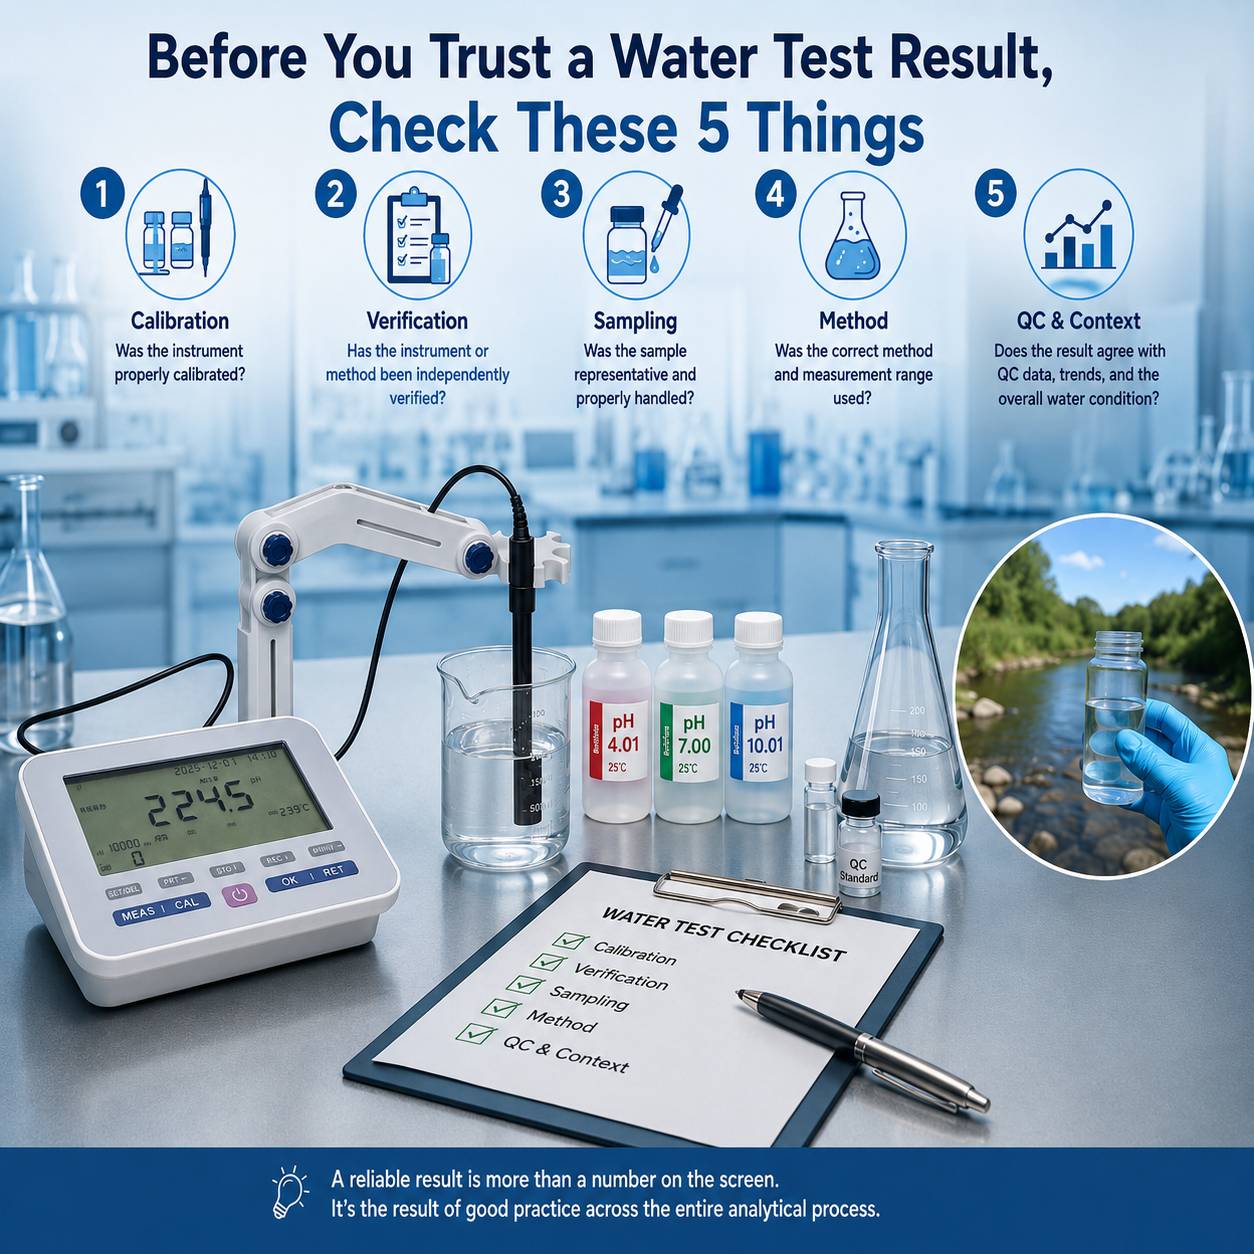
But without proper calibration or verification, the user cannot know whether the result is reliable.
Calibration, Verification, and Adjustment: They Are Not the Same
In routine testing, these three terms are often confused.
Calibration
Calibration compares the instrument response with one or more known standards. It establishes or confirms the relationship between the instrument signal and the expected value.
Verification
Verification checks whether the instrument or method is still performing within acceptable limits. For example, after calibration, a known standard may be tested as a quality control sample to confirm that the measured result is close enough to the expected value.
Adjustment
Adjustment means changing the instrument settings based on the calibration result. For example, a pH meter may adjust its slope and offset after measuring pH buffer solutions. A good routine testing workflow should not only calibrate the instrument, but also verify that the calibration is acceptable.
Term | Main Purpose | Practical Example in Water Testing |
Calibration | Establish or confirm the relationship between instrument response and known standards | Calibrating a pH meter with pH 7.00 and pH 4.00 buffers |
Verification | Check whether the calibrated instrument or method is still performing acceptably | Testing a known conductivity standard after calibration |
Adjustment | Change instrument settings based on calibration results | Adjusting pH meter slope and offset after buffer measurement |
Why Factory Calibration Is Not Enough
Many instruments are calibrated before leaving the factory. This is useful, but it is not a replacement for routine calibration by the user.
Why?
Because the instrument will later be used under different conditions:
l Different temperature
l Different samples
l Different operators
l Different reagent batches
l Different electrodes or probes
l Different cuvettes
l Different storage and transportation conditions
l Different testing frequency
A factory calibration confirms the instrument at one point in time under controlled production conditions. Routine calibration confirms whether the instrument is suitable for the user’s current testing conditions. These are not the same thing.
Calibration in Common Water Quality Instruments
Different water quality instruments require different calibration logic. The basic principle is the same, but the practical details vary.
1. pH Meter Calibration
pH measurement is one of the most common water quality tests, but it is also one of the easiest to misunderstand. A pH meter does not directly “see” pH. It measures the voltage response of a glass electrode and converts that signal into a pH value. That conversion depends heavily on electrode condition and calibration.
This is why pH calibration is not only a meter setting. It is also a check of electrode response, buffer quality, temperature condition, and measurement stability.
Common pH calibration problems
Many pH measurement errors come from simple mistakes:
u Using expired buffer solutions
u Using contaminated buffer solutions
u Reusing buffer poured back into the bottle
u Calibrating with only one point when the sample range is wide
u Using buffers that do not bracket the expected sample pH
u Not rinsing the electrode between buffers
u Not waiting for stable response
u Calibrating at one temperature but testing at another
u Using a dried or poorly stored electrode
u Ignoring electrode slope and offset warnings
Practical pH calibration advice
For routine water testing, pH calibration should usually use at least two points. For example:
l pH 7.00 and pH 4.00 for acidic samples
l pH 7.00 and pH 10.00 for alkaline samples
l pH 4.00, 7.00, and 10.00 for wider or more critical testing ranges
The calibration points should cover the expected sample range whenever possible. A pH meter that is calibrated only at pH 7.00 may still show a stable reading at pH 9.50, but the result may not be accurate enough for reliable reporting. The electrode condition is also critical. If the electrode slope is poor, calibration may fail or appear unstable. In that case, the problem may not be the meter itself, but the electrode.
2. Conductivity Meter Calibration
Conductivity measurement depends on the probe cell constant and temperature compensation. In many routine applications, conductivity meters are considered simple instruments. But calibration still matters.
Common conductivity calibration problems
u Using a standard solution far from the sample range
u Using contaminated conductivity standards
u Not cleaning the probe before calibration
u Air bubbles trapped around the sensor
u Wrong temperature compensation setting
u Using TDS mode without understanding the conversion factor
u Assuming conductivity and TDS are the same measurement
Practical conductivity calibration advice
The calibration standard should be close to the expected measurement range. For example, if most samples are around 1000–2000 μS/cm, a 1413 μS/cm standard may be suitable for routine verification.
If samples are very low conductivity, such as pure water or ultrapure water, low-range calibration and careful handling become much more important. Low-conductivity water requires more careful calibration and handling than many users expect. In pure water or ultrapure water applications, small contamination from the container, probe surface, air exposure, or residual cleaning solution can cause a noticeable change in conductivity. For this reason, low-range conductivity testing should use clean containers, suitable standards, and careful temperature control.
3. Photometer and Spectrophotometer Calibration
Photometers and spectrophotometers are widely used for routine water analysis, especially for parameters measured by colorimetric methods. For photometric measurement, the instrument reads light absorbance or transmittance and converts it into concentration. This conversion depends on method settings, wavelength, blank correction, reagent reaction, cuvette condition, and calibration curve.
Common photometric calibration and verification problems
u Using the wrong method program
u Using the wrong wavelength
u Skipping the reagent blank
u Using scratched or dirty cuvettes
u Using expired reagents
u Testing outside the method range
u Ignoring sample color or turbidity interference
u Using poor-quality standards
u Not verifying the calibration curve
u Assuming pre-programmed methods never need checking
Practical photometric testing advice
For routine photometric water testing, users should pay attention to:
l Correct method selection
l Correct reagent dosage
l Correct reaction time
l Correct blanking procedure
l Clean and matched cuvettes
l Valid method range
l Standard verification when results are critical
A photometer can be very efficient for routine testing, but it must be used with proper method control. Pre-programmed methods make routine photometric testing easier, but they do not remove the need for method verification. A stored method can only produce reliable results when the reagent, blank, wavelength, reaction time, sample preparation, and detection range are suitable for the sample being tested. For critical results, users should verify the method with a known standard or quality control sample before trusting the final concentration value.
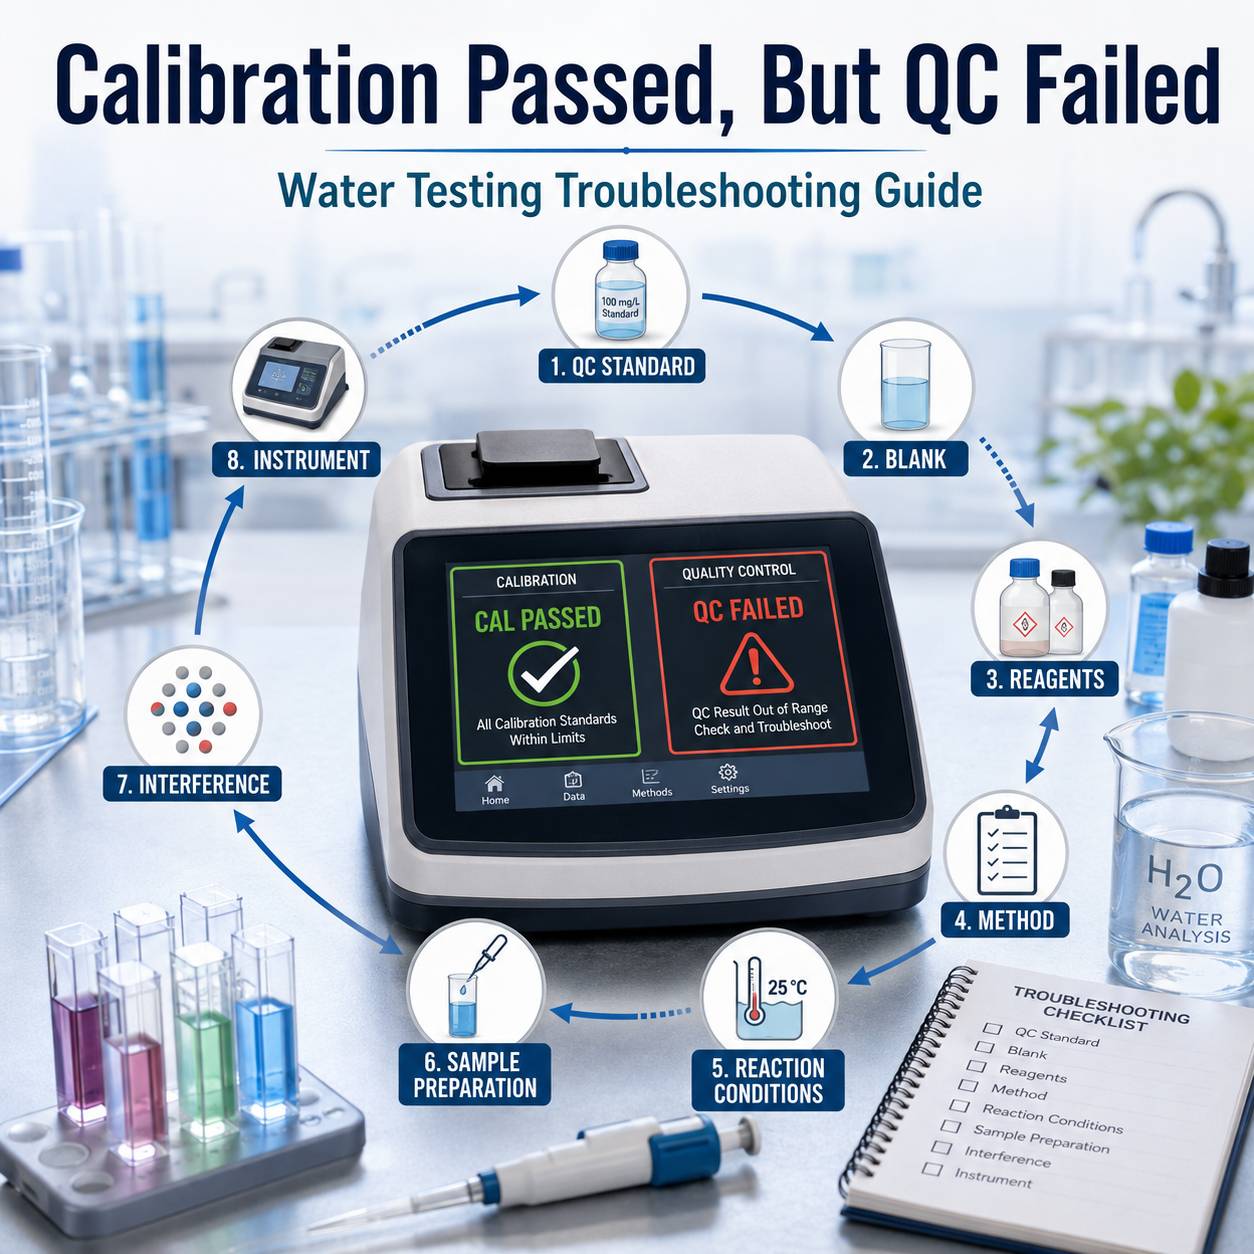
The instrument is only one part of the measurement process. The chemical reaction and sample preparation are equally important.
Common Mistakes That Make Calibration Unreliable
Calibration can only improve reliability when it is done correctly. Here are several common problems that reduce the value of calibration.
1. Treating Calibration as a Box-Ticking Step
Some users calibrate only because the procedure requires it. They do not check whether the calibration result is acceptable.
But calibration is not complete just because the instrument accepted the standard. Users should also ask:
n Was the standard correct?
n Was the response stable?
n Was the slope acceptable?
n Was the blank properly prepared?
n Was the standard within shelf life?
n Was the calibration range suitable for the sample?
n Was the result verified after calibration?
If these questions are ignored, calibration becomes only a formal step, not a quality control step.
2. Using Old or Contaminated Standards
Calibration is only as reliable as the standard solution. If the standard is expired, contaminated, evaporated, diluted incorrectly, or stored poorly, the calibration result may be wrong.
This is a common problem in routine laboratories. A low-cost standard solution problem can create expensive data quality problems. Good practice includes:
ü Checking expiry dates
ü Closing bottles immediately after use
ü Avoiding direct contact with probes inside the storage bottle
ü Never pouring used standard back into the original bottle
ü Storing standards according to instructions
ü Replacing standards regularly
3. Calibrating at the Wrong Range
Calibration should be relevant to the sample. For example, if the sample is expected to be strongly alkaline, calibration only around neutral pH may not be enough. If a photometric method is used near the top of its detection range, users should verify whether dilution or a higher range method is required. If conductivity samples are very low in ionic strength, a general high-range standard may not provide enough confidence.
The best calibration practice is not just “calibrate the instrument.” It is “calibrate or verify the instrument in a way that matches the sample and decision.”
4. Ignoring Temperature Effects
Many water quality measurements are affected by temperature. This is obvious for conductivity and pH, but it can also influence reaction rates in colorimetric testing.
Automatic temperature compensation helps, but it does not solve every problem.
For example:
u A cold pH electrode may respond slowly
u Conductivity standards have temperature-dependent values
u Reagent reactions may require a specific reaction time and temperature range
u Samples tested immediately after digestion may not be ready for accurate photometric reading
Temperature should be part of the measurement workflow, not an afterthought.
5. Assuming Calibration Fixes All Problems
Calibration is important, but it cannot correct every issue. Calibration will not fully solve:
u Poor sample collection
u Wrong sample preservation
u Expired reagents
u Strong matrix interference
u Dirty cuvettes
u Air bubbles
u Incorrect dilution
u Wrong method selection
u Operator mistakes
u Damaged electrodes
u Unstable samples
This is why calibration should be combined with proper sampling, method control, and result verification.
How Often Should Water Quality Instruments Be Calibrated?
There is no single calibration frequency that fits every laboratory or field application. Calibration frequency should be risk-based. Instruments used for critical reporting, unstable samples, field testing, high-frequency testing, or complex wastewater matrices usually need more frequent calibration or verification than instruments used for simple screening under stable laboratory conditions.
Calibration frequency depends on:
l Parameter type
l Instrument type
l Measurement frequency
l Sample complexity
l Required accuracy
l Regulatory requirements
l Electrode or probe stability
l Reagent lot changes
l Environmental conditions
l Whether the result is used for reporting or process control
However, calibration or verification is especially important in these situations:
ü Before daily routine testing
ü Before testing critical samples
ü After changing electrodes or probes
ü After replacing reagent lots
ü After instrument maintenance
ü After abnormal or unexpected results
ü After long storage
ü After transporting portable instruments
ü When quality control checks fail
ü When sample conditions change significantly
For field instruments, calibration should often be checked more frequently because field conditions are less controlled than laboratory conditions.
A Practical Calibration Checklist for Routine Water Testing
Before calibration | During calibration | After calibration |
Check whether the instrument is clean and in good condition | Use the correct standard | Verify with a known standard or quality control sample |
Confirm that standards are valid and properly stored | Avoid cross-contamination | Confirm that the measured value is within acceptable limits |
Prepare fresh calibration solution if needed | Wait for stable response | Do not continue testing if verification fails |
Confirm the expected sample range | Follow the correct sequence | Recalibrate or troubleshoot before reporting results |
Select suitable calibration points | Check slope, offset, or acceptance criteria | Keep calibration records for traceability |
Allow the instrument and standards to reach suitable temperature | Record calibration results when needed | |
Clean or rinse probes, cuvettes, or sample cells |
This checklist is simple, but it can prevent many routine testing errors.
Good Calibration Supports Better Decision-Making
Water quality testing is not only about producing numbers. The purpose of testing is to support decisions. A result may influence:
l Treatment adjustment
l Discharge control
l Compliance reporting
l Process troubleshooting
l Equipment selection
l Chemical dosing
l Safety evaluation
l Customer communication
If calibration is weak, decisions based on the result become weaker too. This is why calibration should be seen as part of data quality, not just instrument operation.
Conclusion
Calibration is not a formality. It is the foundation that connects the instrument, method, standard, sample, and final result. In routine water testing, calibration is not only about making the instrument ready. It is about making the result defensible. A defensible result requires a suitable instrument, valid standards, correct methods, proper sample handling, and clear calibration records. When these elements work together, water quality data becomes more than a number — it becomes a reliable basis for decision-making.
In routine water analysis, the question should not be: “Has the instrument been calibrated?”
The better question is: “Has the instrument been calibrated correctly for this sample, this method, and this decision?”
When calibration is treated seriously, water quality data becomes more reliable. And when data becomes more reliable, laboratories, field teams, and water treatment professionals can make better decisions.