+852 46135220

A water quality analyzer completes calibration successfully. The calibration curve looks normal. The instrument reports no error. Then a quality control (QC) standard is measured — and the result falls outside the acceptable range.
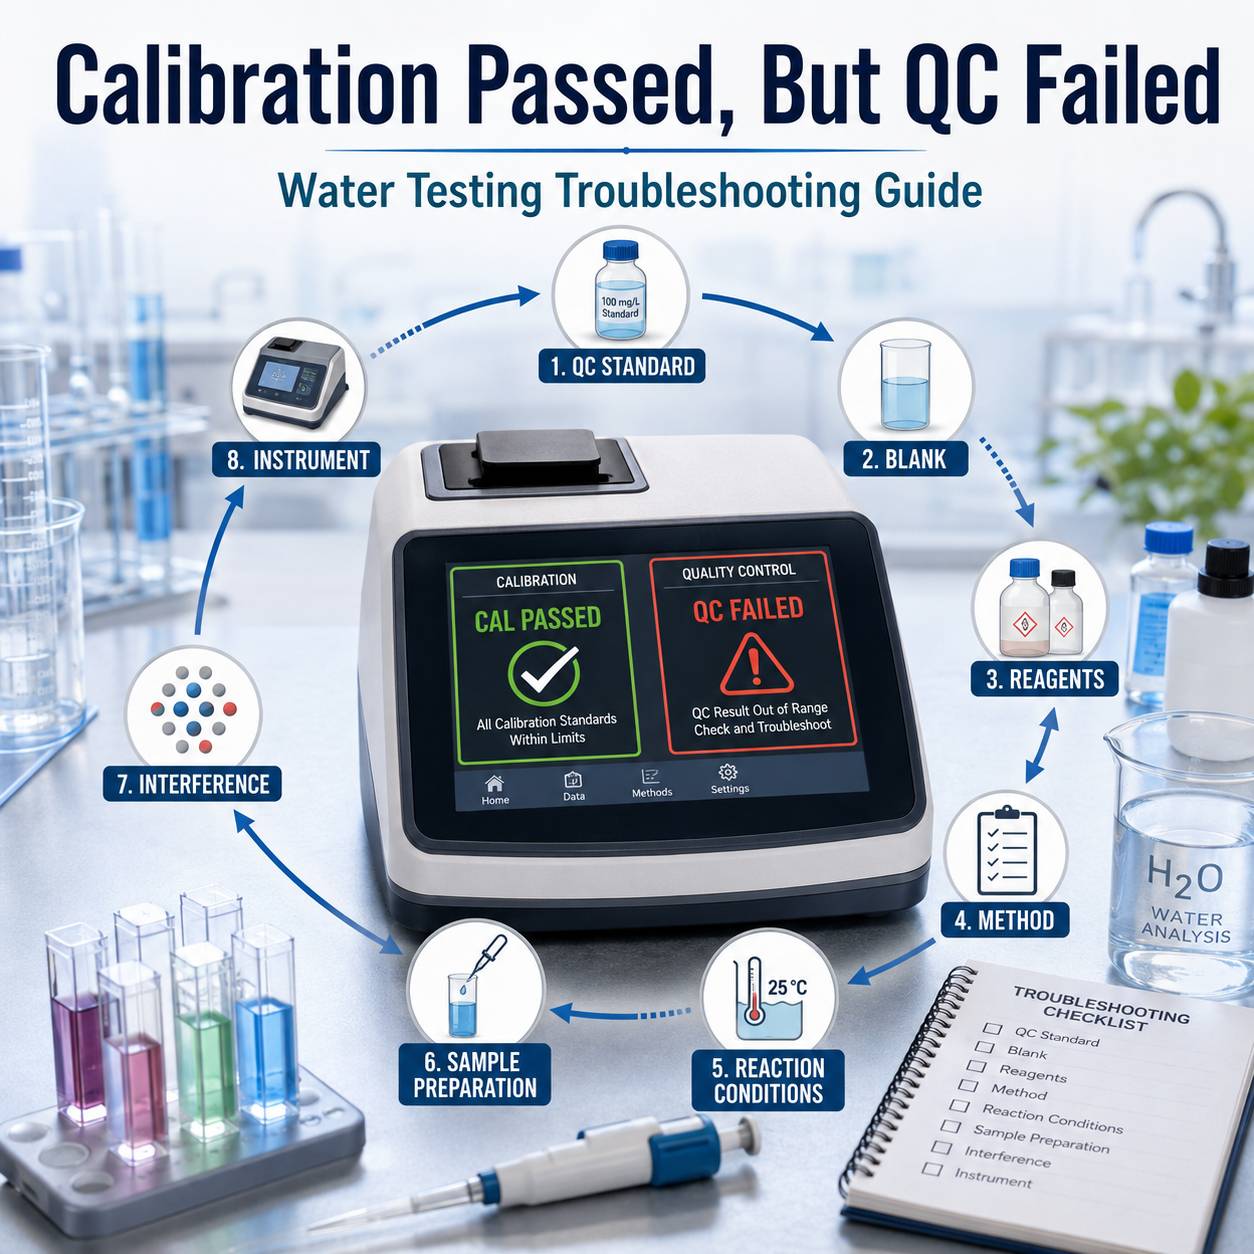
What should happen next? A common reaction is to recalibrate the instrument immediately. Sometimes that solves the problem. But in many cases, calibration itself is not the real issue. A passed calibration confirms that the instrument responded acceptably to the calibration standards under specific conditions. It does not confirm that the entire analytical process is working correctly. If QC fails after calibration, the problem may come from the QC standard, blank, reagents, test method, sample preparation, reaction conditions, cuvettes, operator technique, matrix interference, or the instrument itself.
A practical troubleshooting sequence is: Confirm the QC failure → check the QC standard → prepare a fresh blank → inspect reagents → verify the method and test conditions → review sample preparation → check the instrument → recalibrate if necessary.
The important question is therefore not simply: “Should I calibrate again?”
A better question is: “Which part of the analytical process is no longer under control?”
1. What Does a Passed Calibration Actually Confirm?
Calibration establishes the relationship between an instrument response and known reference values under specific calibration conditions. If calibration passes, it generally indicates that the analyzer was able to produce an acceptable response to the calibration standards used at that time. That is important — but it does not automatically confirm that every subsequent measurement will be correct.
A routine water test normally depends on much more than the instrument alone. The complete analytical process may include:
l calibration standards
l QC standards
l reagents
l blanks
l cuvettes or sample cells
l electrodes or sensors
l sample preparation
l digestion
l dilution
l reaction time
l temperature
l wavelength or test method selection
l operator technique
l instrument performance
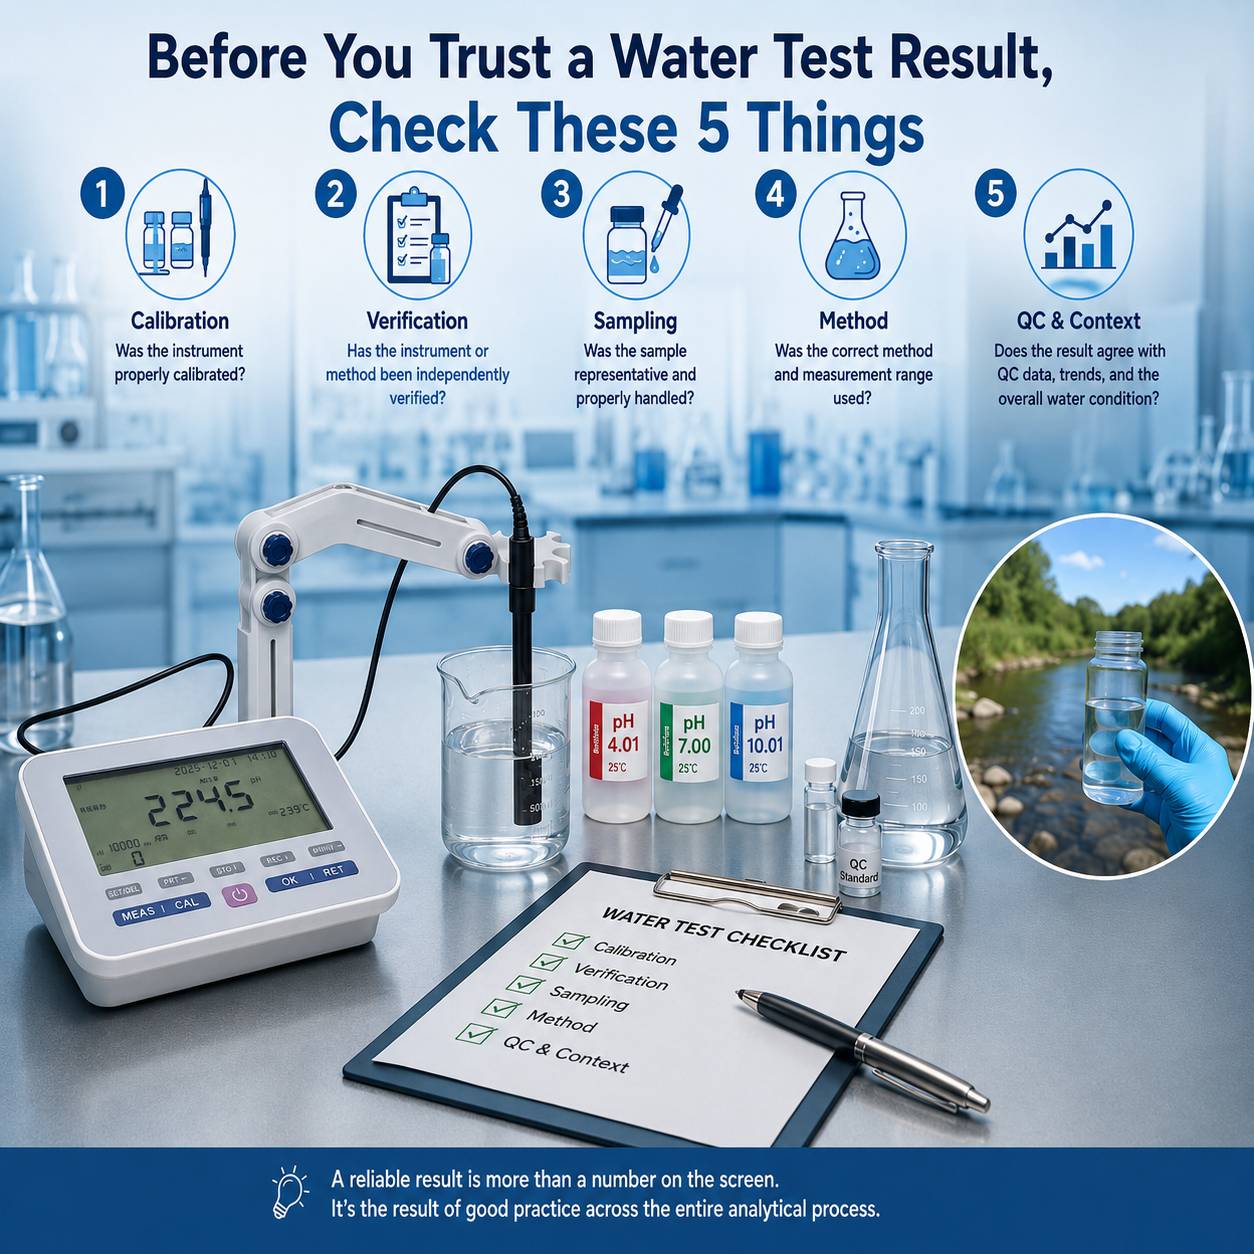
Calibration checks only part of this system. This explains why an analyzer can pass calibration while a QC result still fails. In simple terms, calibration evaluates the measurement relationship, while QC evaluates whether the broader analytical process is producing acceptable results. This is why calibration and QC should not be treated as interchangeable checks
2. Confirm What Actually Failed
Before troubleshooting, identify exactly which control step produced the unexpected result.
There is an important difference between:
Situation | What It May Indicate | What to Check First |
Calibration fails | Instrument response, calibration standards, sensor condition, or calibration procedure may be unacceptable | Calibration standards, method, instrument or sensor |
Verification fails | Calibration may not accurately reproduce an independent known value | Verification standard, calibration, method and instrument |
QC fails | One or more parts of the analytical process may be outside control | QC standard, blank, reagents, procedure and instrument |
QC passes but sample looks wrong | The problem may be sample-specific | Matrix interference, dilution, contamination or sample handling |
The exact acceptance criteria should follow the laboratory's method, SOP, regulatory requirement, or quality management procedure rather than a universal pass/fail limit.
3. Repeat the QC Check — But Do It Carefully
When one QC result fails, the first practical step is often to repeat the QC measurement once. However, simply measuring the same prepared solution again without changing anything provides limited information. Before repeating the test, check basic factors such as:
l Was the correct QC standard used?
l Was the correct method selected?
l Was the correct test range selected?
l Was the cuvette clean?
l Was the sample mixed properly?
l Was the correct reaction time followed?
l Was the measurement taken at the correct temperature?
l Was the instrument zeroed or blanked correctly?
If the repeated QC result is acceptable, the first failure may have resulted from a procedural or handling issue. If the QC fails again, a more systematic investigation is needed.
4. Check the QC Standard
The QC standard itself is one of the first things to investigate. A reference solution can produce an incorrect result even when the analyzer is functioning normally. Ask the following questions:
* Is the concentration correct?
Confirm that the expected QC concentration matches the method and measurement range being used. A 10 mg/L QC standard measured using a method intended for a substantially different concentration range may not provide the intended control.
* Has the standard expired?
Reference standards can deteriorate over time. Do not assume that a standard remains reliable simply because the solution still looks normal.
* Was it stored correctly?
Depending on the material, improper storage temperature, light exposure, evaporation, contamination, or repeated opening can affect concentration or stability.
* Was the QC solution prepared correctly?
If the QC solution was prepared by dilution, verify:
l stock concentration
l dilution factor
l pipette volume
l volumetric flask volume
l units
l calculation
A small dilution error can create a very consistent but incorrect QC result.
* Could the standard be contaminated?
Cross-contamination from pipettes, bottles, cuvettes, or working surfaces can also affect QC measurements. If possible, prepare a fresh QC solution independently and compare the result.
Where practical, the QC material should provide an independent check rather than simply repeating the same preparation used for calibration. Using an independently prepared control solution, separate standard source, or certified reference material where appropriate can provide stronger evidence that the analytical process is performing correctly.
5. Check the Blank
The blank is sometimes overlooked because it does not appear to be the “measurement” itself. But an incorrect blank can shift an entire series of results. This is especially important in photometric water analysis. A blank may be affected by:
n contaminated water
n residual chemicals in the cuvette
n incorrect reagent addition
n dirty glassware
n scratched or stained sample cells
n incorrect zeroing procedure
n turbidity or color in the blank solution
If the blank signal is incorrect, every subsequent measurement may also be shifted. That means calibration can appear acceptable under one set of conditions while a later QC test produces an unexpected result. Whenever a QC result suddenly changes, preparing a fresh blank is often a simple and useful troubleshooting step. If multiple QC or sample results shift in the same direction, checking the blank should be one of the first troubleshooting steps.
6. Check the Reagents
Reagents are another common source of QC problems. In many colorimetric water tests, the analyzer is only measuring the optical response created by a chemical reaction. If that chemical reaction is incomplete or abnormal, the instrument may accurately measure the wrong reaction response. Possible reagent-related problems include:
u expired reagents
u incorrect storage
u exposure to moisture
u exposure to excessive heat
u contamination
u wrong reagent volume
u incomplete dissolution
u incorrect reagent sequence
u reagent lot variation
u mixing different reagent kits or batches
This distinction is important: The instrument can function correctly while the chemistry does not. For that reason, repeatedly recalibrating an analyzer will not necessarily correct a reagent problem. If QC failure begins shortly after changing a reagent lot, replacing reagents, or opening a new package, the reagent should be included early in the investigation.
7. Check the Test Method and Measurement Range
Many modern water quality analyzers contain multiple stored methods. Selecting the wrong method can therefore produce a technically valid reading that is analytically meaningless. Confirm:
l parameter
l wavelength
l concentration range
l reagent type
l sample volume
l reaction procedure
l result unit
For example, two ammonia methods may use different reagent chemistries or concentration ranges. Using the wrong stored method may still generate a numerical result, but that result may not correspond to the actual test procedure. Also check whether the QC concentration is comfortably inside the working range. Measurements near the extreme low or high end of a method range may show greater variability than measurements near the middle.
8. Check Reaction Time and Temperature
Many water quality methods depend on controlled reaction conditions. Color development may continue for several minutes before reaching the appropriate measurement point. Reading too early may produce a result that is too low. Reading too late may also change the result for methods in which the developed color is not indefinitely stable.
Important variables include:
n reagent addition time
n mixing time
n digestion time
n cooling time
n color development time
n measurement window
n sample temperature
When several samples are processed together, timing differences between the first and last cuvette can become significant. A timer and consistent sample sequence can therefore be just as important as the analyzer itself.
9. Check Sample Cells and Optical Surfaces
For photometers and spectrophotometers, the cuvette is part of the optical measurement system. Even a correctly calibrated instrument can produce poor QC results if the sample cell is compromised. Check for:
l fingerprints
l water droplets
l scratches
l stains
l reagent residue
l bubbles
l inconsistent cuvette orientation
l different optical path lengths
l dirty cuvette compartments
Where practical, use the same type of cuvette for calibration, QC, and sample measurement. Also make sure the outer surface is clean and dry before measurement. This may seem like a small detail, but small optical differences can become important when measuring low concentrations.
10. Check Sample Preparation, Digestion, and Dilution
If the QC procedure includes digestion, extraction, dilution, filtration, or other preparation steps, these should be investigated separately from the instrument. For example, a QC failure may originate from:
u incorrect dilution
u incomplete digestion
u sample loss
u pipetting error
u insufficient mixing
u contamination
u incorrect sample volume
u transfer loss
u filtration effects
This is particularly important for parameters such as:
n COD
n metals
n nutrients requiring digestion
When digestion is part of the method, the digestion block, temperature, time, tubes, and reagent addition procedure all become part of the analytical system. A successful photometer calibration cannot compensate for an incomplete digestion. For digestion-based water tests, the digestion procedure is effectively part of the measurement method, not a separate preliminary step.
11. Consider Matrix Interference
QC standards are often prepared in relatively clean matrices. Real water samples may be very different. Wastewater, industrial water, seawater, colored samples, and high-salinity samples can contain substances that interfere with the measurement. Possible interference may come from:
l turbidity
l natural color
l suspended solids
l high salinity
l oxidizing or reducing substances
l other ions
l organic compounds
l extreme pH
If a laboratory control standard passes but a spiked sample or matrix QC fails, the issue may not be calibration at all. The sample matrix may be influencing the analytical chemistry or optical measurement. This is why QC should be interpreted in the context of the actual method and sample type.
A useful troubleshooting clue is the difference between a clean QC standard and a real sample matrix:
n QC fails in a clean control solution: investigate the standard, reagents, method, procedure, or instrument.
n QC passes but a spiked or real sample behaves unexpectedly: investigate matrix interference and sample preparation more closely.
12. Check the Instrument — But Do Not Start There Automatically
After excluding simpler causes, inspect the analyzer itself. Possible instrument-related issues include:
Optical instruments
u lamp instability
u detector drift
u wavelength problems
u dirty optical compartment
u inconsistent sample positioning
u temperature effects
u electronic instability
Electrochemical instruments
u aged electrode
u contaminated membrane
u clogged junction
u depleted electrolyte
u damaged sensor
u unstable reference system
u incorrect temperature compensation
Electrodes deserve particular attention because they gradually change with use. A pH meter, for example, may technically complete calibration but still show slow response or unstable behavior if the electrode is deteriorating. Calibration acceptance alone therefore does not always describe overall measurement quality. The troubleshooting priority can therefore depend on the measurement technology. For photometric methods, reagent chemistry, blanking and optical cells deserve particular attention. For electrochemical methods, sensor condition, calibration slope, response time and temperature compensation may become more important.
13. Look for Patterns in the QC Data
One failed QC result provides limited information. A series of QC results can reveal much more. Instead of asking only whether the latest QC result passed or failed, examine the trend. For example:
What Different QC Patterns May Suggest
QC Pattern | Possible Causes |
Gradual drift | Reagent deterioration, electrode aging, standard instability, instrument drift |
Sudden shift | New reagent lot, new standard, recalibration, maintenance, method change |
Random scatter | Pipetting, mixing, timing, bubbles, unstable sensor response |
Consistent high or low bias | Standard preparation, dilution error, blank error, calibration or method bias |
QC trends often provide more diagnostic information than a single pass/fail decision.
14. A Practical Troubleshooting Sequence
When calibration passes but QC fails, the following sequence can provide a practical starting point.
Step 1 — Confirm the failure
Repeat the QC measurement once using the same method but carefully checking basic procedure.
Step 2 — Check the QC standard
Verify concentration, preparation, storage, expiration date, and contamination risk.
Step 3 — Prepare a fresh blank
Confirm that zeroing or blank correction is reliable.
Step 4 — Check reagents
Verify reagent identity, condition, lot, storage, volume, and sequence.
Step 5 — Confirm the method
Check parameter, range, wavelength, reaction procedure, and units.
Step 6 — Review timing and temperature
Confirm reaction, digestion, cooling, and measurement conditions.
Step 7 — Check sample cells and handling
Inspect cuvettes, pipettes, glassware, mixing, and transfer steps.
Step 8 — Investigate sample preparation
Review digestion, dilution, filtration, and other pretreatment steps.
Step 9 — Evaluate possible interference
Consider whether the matrix can affect the method.
Step 10 — Check the instrument
Inspect optical components, electrodes, sensors, and general performance.
Step 11 — Recalibrate if justified
After identifying calibration as a possible source, perform a fresh calibration and verify it using an independent control.
QC Failure Troubleshooting Table
Observation | Possible Cause | Recommended First Action |
One QC result fails unexpectedly | Handling, timing or cuvette issue | Carefully repeat the QC once |
Repeated QC results fail similarly | QC standard, blank, reagent or systematic error | Prepare fresh control and blank |
QC changes after reagent lot change | Reagent-related variation | Compare with fresh or previous validated reagent |
QC gradually drifts over time | Reagent degradation, electrode aging or instrument drift | Review QC trend and consumable/sensor condition |
Calibration passes but independent QC fails | Calibration does not represent full analytical performance | Investigate standard, chemistry, method and instrument |
QC passes but real samples look abnormal | Matrix or sample preparation issue | Investigate interference, dilution and sample handling |
Several parameters suddenly behave abnormally | Common procedural or instrument factor | Check blank, environment, instrument and recent changes |
FAQ
1.Can an instrument pass calibration and still give incorrect results?
Yes. Calibration confirms the instrument response under defined calibration conditions. Incorrect results can still arise from reagents, standards, blanks, sample preparation, timing, interference, operator technique, sensor condition, or other parts of the analytical process.
2.Should I always recalibrate when QC fails?
No. Recalibration may be necessary, but it should not automatically be the first corrective action. First confirm the QC standard, blank, reagents, method, procedure, and test conditions.
3.What is the first thing to check after a QC failure?
Start by confirming the failure with a careful repeat measurement. Then verify the QC standard and blank before making major changes to the system.
4.Can expired reagents cause QC failure even if calibration passes?
Yes. For many water testing methods, the measured signal depends on a chemical reaction. If the reagent is degraded, the analyzer may correctly measure an incorrect or incomplete chemical response.
5.Why is QC trending useful?
A single QC result only shows one point in time. A series of QC results can reveal drift, sudden shifts, random variability, or systematic bias and can help identify the likely source of the problem earlier.
Conclusion
A successful calibration is an important part of reliable water testing, but it is not the final proof that every result can be trusted. When QC fails after calibration, the most effective response is not to immediately assume that the instrument is defective. Instead, investigate the analytical system as a whole:
QC standard → blank → reagents → method → reaction conditions → sample preparation → interference → instrument
Reliable water testing depends on all of these elements working together. The goal of QC is therefore not simply to produce another number. Its real value is to tell the laboratory when the measurement process may no longer be under control — and to provide an opportunity to identify the cause before questionable results are reported. In routine water analysis, that distinction can make the difference between a measurement that merely looks reasonable and one that can actually be trusted.
Calibration tells you whether the instrument can establish an acceptable measurement relationship. QC helps determine whether the analytical process remains under control. Troubleshooting connects the two by identifying what changed when they no longer agree.