+852 46135220

In routine water testing, the most difficult result is not always the clearly compliant one or the clearly failed one. The most difficult result is often the one that is very close to the limit. For example:
l COD result close to the discharge limit
l Ammonia nitrogen near the regulatory threshold
l Free chlorine slightly below the required range
l Phosphate close to an internal control limit
l Turbidity or pH near the acceptable boundary
In these situations, the question is not simply: “What is the number?”
The better question is: “Can this number be trusted enough to support a decision?”
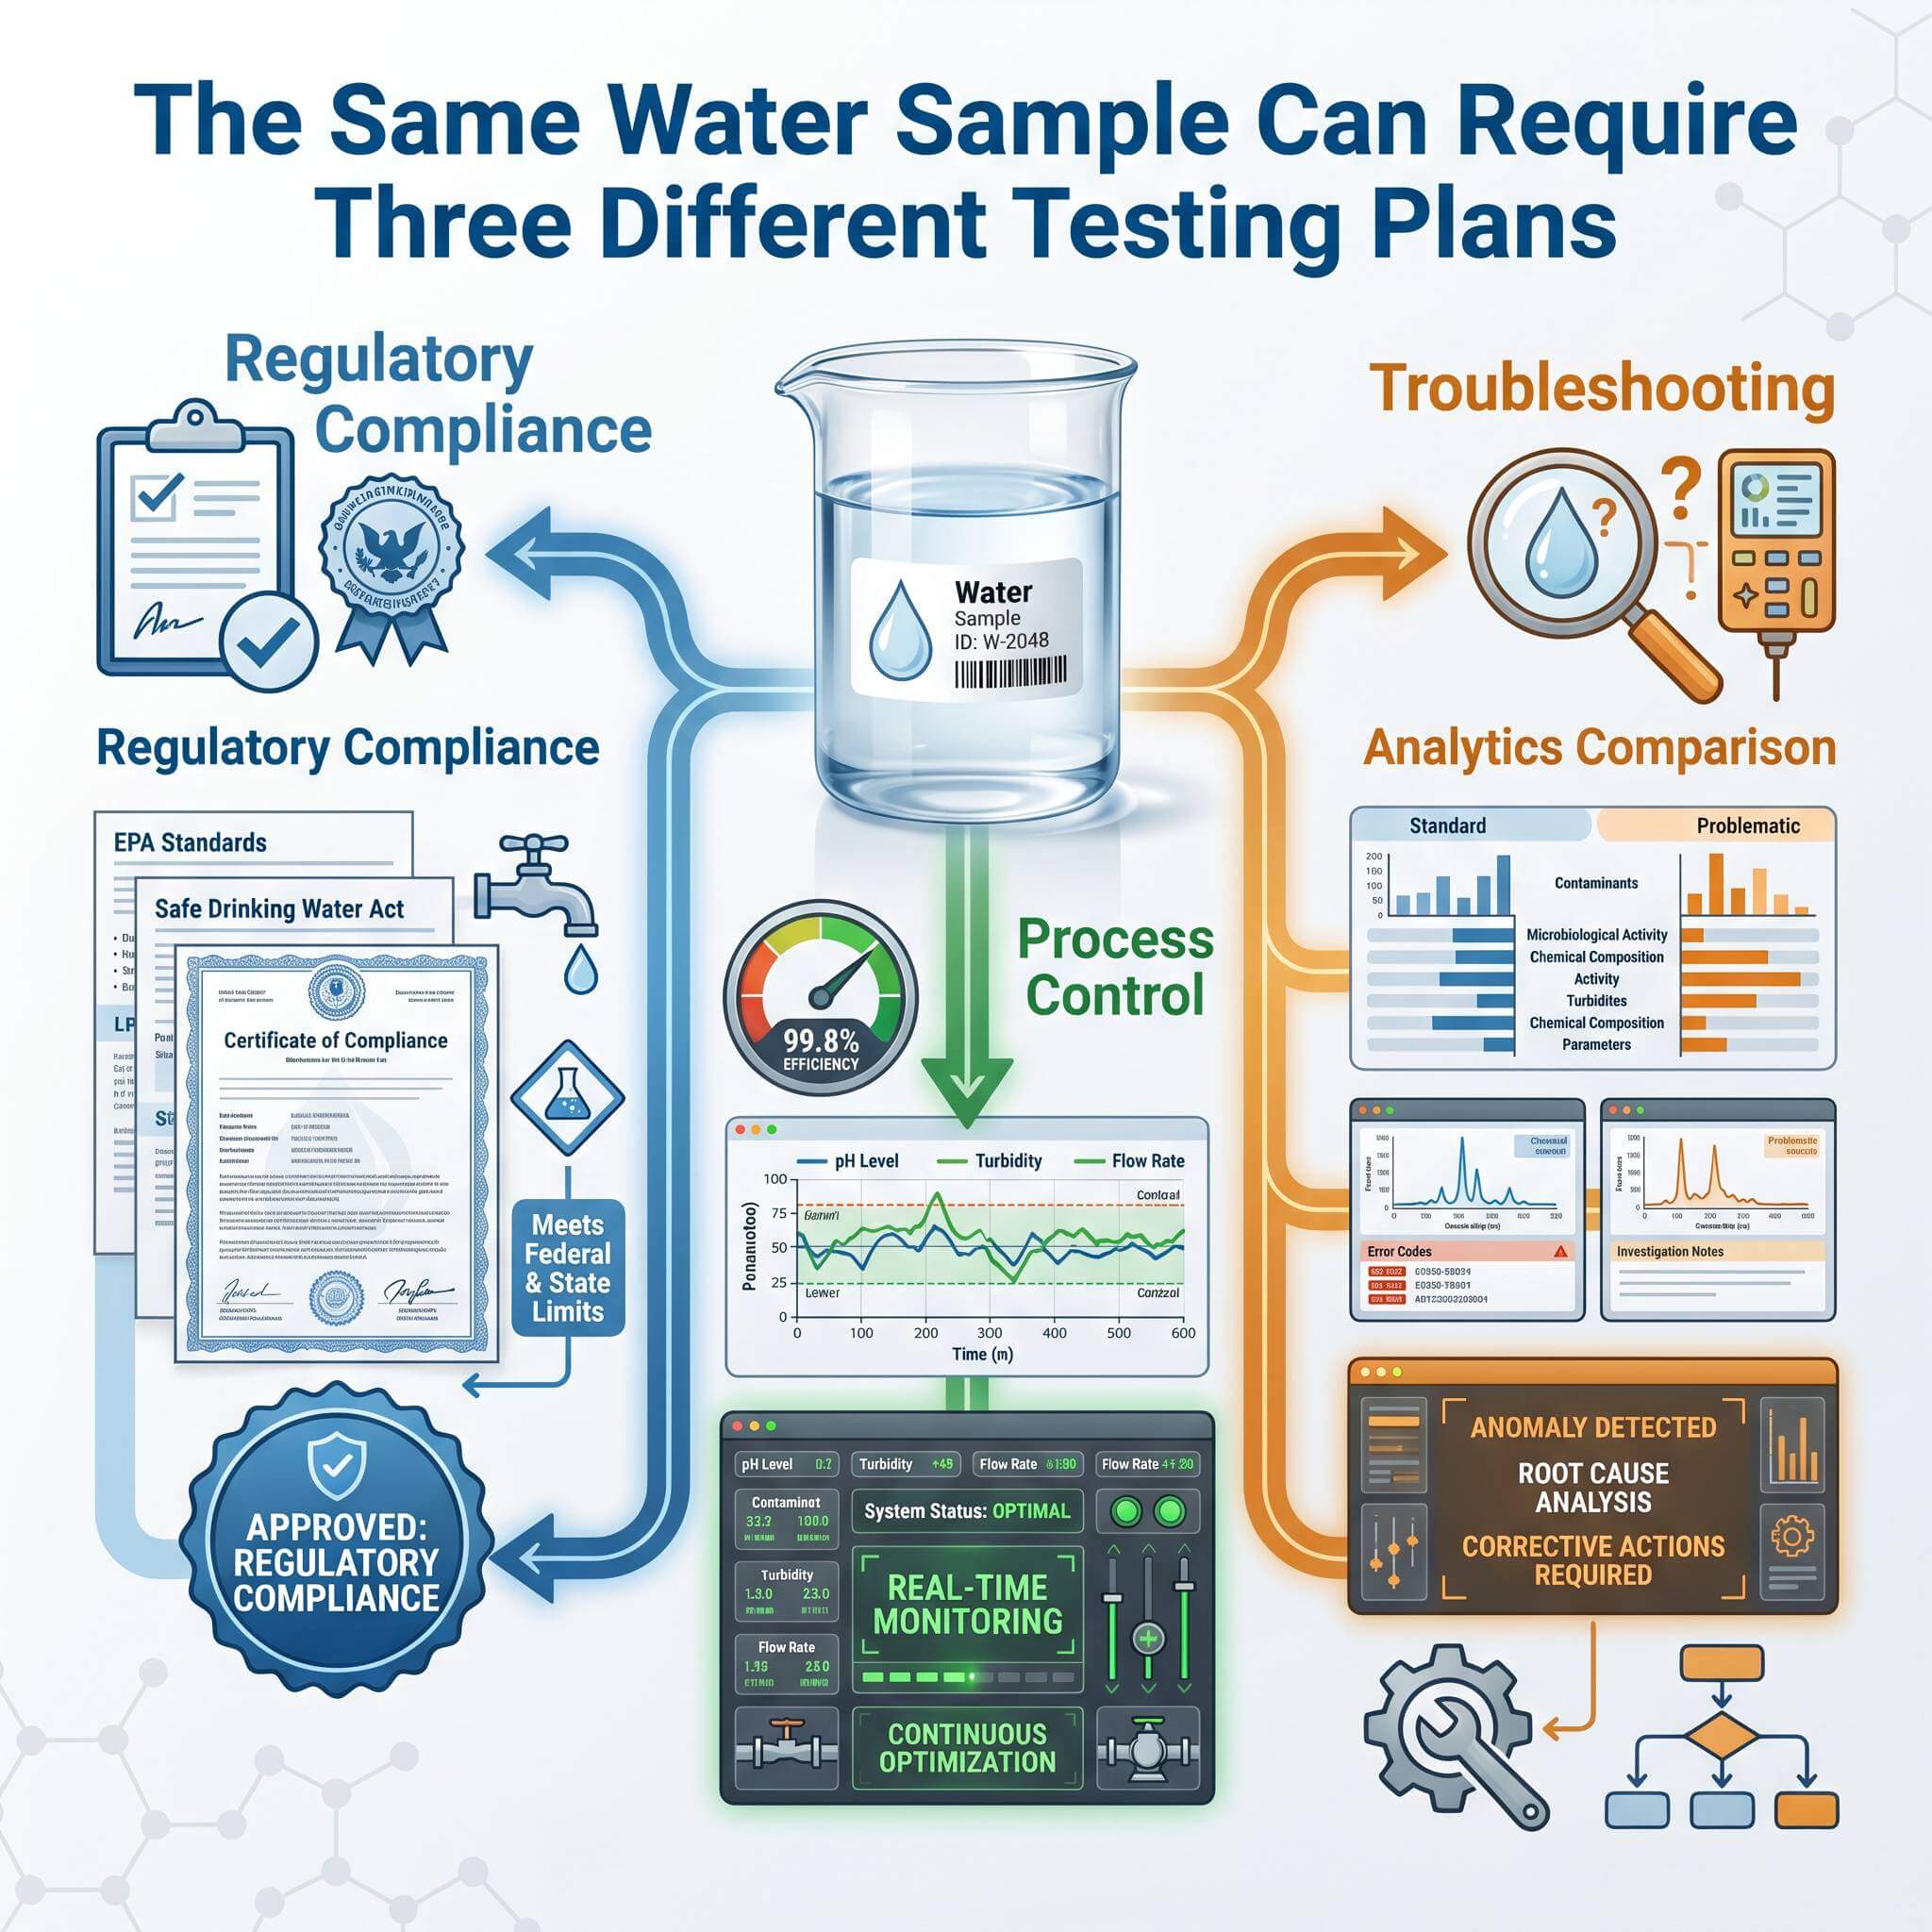
This situation is common in wastewater discharge monitoring, drinking water compliance testing, industrial process water control, aquaculture water management, environmental monitoring, and third-party laboratory analysis. Whether the lab is using a photometer, spectrophotometer, electrochemical meter, or digestion-based method, the key issue is the same: a result close to the limit needs stronger quality-control evidence before it can support a pass/fail decision.
A result close to the limit may affect whether a wastewater discharge is accepted, whether a process adjustment is needed, whether a sample should be retested, or whether a customer, operator, or regulator needs to be notified. When a water test result is close to the limit, the lab should first check whether the result is within the proper method range, then review calibration verification, blank results, reagent quality, sample handling, dilution accuracy, and QC evidence. A near-limit result should not be accepted based only on the instrument reading. It should be supported by a controlled testing workflow and relevant quality-control checks.
That is why laboratories should not treat near-limit results as ordinary routine readings. They require a more careful review of the testing system.
Why Near-Limit Results Need Extra Attention
A water test result is not just a number displayed by an instrument. It is the final output of a complete testing process, including:
l sample collection
l sample preservation
l holding time
l reagent quality
l calibration
l verification
l blank correction
l dilution
l digestion or reaction time
l cuvette condition
l operator technique
l instrument condition
l method range
When the result is far below or far above the limit, small testing errors may not change the final decision. But when the result is close to the limit, even a small error can change the conclusion. For example, if the discharge limit for a parameter is 50 mg/L and the measured result is 49.2 mg/L, the laboratory may report the sample as compliant. But if the true result is slightly higher due to a blank error, dilution error, or calibration drift, the decision may be wrong.
This is why near-limit results should be handled with a quality-control mindset, not only a measurement mindset.
First, Check Whether the Result Is Within the Proper Measuring Range
The first question should be: Is the result within the most reliable range of the method?
The instrument may display a numerical value outside the most reliable part of the method range, but this does not always mean the result is suitable for reporting. In routine water testing, the method range, reagent chemistry, sample matrix, and decision limit should be considered together. A method is only useful when its reliable measuring range matches the concentration level that the lab needs to control.
If the concentration is too low, the result may be more sensitive to:
l reagent blank variation
l cuvette cleanliness
l minor contamination
l instrument resolution
l background color
l small pipetting differences
If the concentration is too high, the result may be affected by:
l non-linearity
l incomplete color development
l matrix interference
l improper dilution
l absorbance outside the ideal range
A near-limit result should be checked against the method range before making a decision. If the result is close to the upper end of the range, dilution may be needed. If the result is close to the lower end, the laboratory should consider whether the method sensitivity is suitable for that decision limit.
Second, Review the Calibration Status
Calibration is one of the first items to check when a result is close to a critical limit.
But the question should not only be: “Was the instrument calibrated?”
The better questions are:
u Was the calibration performed recently enough?
u Was the correct calibration range used?
u Were the calibration standards suitable for this parameter?
u Was the calibration verified after completion?
u Was the verification concentration close to the decision limit?
A calibration curve may look acceptable, but that does not automatically guarantee that a near-limit sample result is reliable. For example, if the sample result is close to a low regulatory limit, but the calibration verification was only performed at a medium concentration, the verification may not fully confirm performance near the actual decision point. This is why many laboratories use calibration verification standards at different levels, such as low, medium, and high concentration points.
For near-limit results, calibration verification should ideally include a concentration level close to the decision limit. If the lab only verifies the calibration at a midpoint, it may miss performance problems at the low end or high end of the method range. This is especially important for parameters such as COD, ammonia nitrogen, nitrate, phosphate, residual chlorine, and turbidity, where small differences may affect compliance decisions.
For routine water testing, verification near the decision limit is often more meaningful than verification at a random convenient concentration.
Third, Check the Blank Result
Blank control is one of the most important checks for near-limit water test results. In many routine tests, especially photometric methods, the blank is not just a formality. It helps identify background contribution from:
l reagent color
l deionized water quality
l sample container contamination
l cuvette contamination
l digestion reagents
l laboratory environment
l method background
When the sample concentration is low or close to a limit, a small blank error can become significant. For example, in low-level ammonia, phosphate, nitrate, nitrite, chlorine, or COD testing, the blank can influence whether the final result is considered acceptable or not.
The lab should check:
u Was the correct blank used?
u Was the blank freshly prepared?
u Was the blank value stable and reasonable?
u Was the blank handled in the same way as the sample?
u Was a reagent blank or method blank required?
u Was the blank correction applied correctly?
If the blank is abnormal, the sample result should not be accepted without further review. When the sample result is close to the limit, the blank is not a background detail. It can become the difference between a pass decision and a fail decision.
Fourth, Confirm Reagent Quality and Reaction Conditions
Reagents are often overlooked when a test result looks questionable. However, reagent quality can directly affect photometric and colorimetric water testing. Before accepting a near-limit result, the lab should confirm:
l reagent expiration date
l reagent storage condition
l reagent lot change
l color change or precipitation in reagent
l correct reagent volume
l correct reaction time
l correct reaction temperature
l complete mixing
l correct digestion condition, if digestion is required
This is especially important for tests such as COD, ammonia nitrogen, phosphate, nitrate, nitrite, residual chlorine, silica, and other colorimetric parameters. A near-limit result may not be caused by the water sample itself. It may come from a reagent issue, incomplete reaction, or timing inconsistency. For methods with strict color development time, reading too early or too late may shift the result. For digestion methods, incomplete digestion or improper heating can also affect the final value.
If a new reagent lot is introduced, the lab should verify its performance before using it for critical near-limit samples. A simple comparison with a known standard or control sample can help confirm that the new reagent lot does not shift the result.
Fifth, Review the Sample Condition
A water sample can change before it reaches the instrument. This is why sample condition should always be reviewed when the result is close to the limit. The lab should ask:
u Was the sample collected from the correct location?
u Was the sample representative?
u Was the container clean and suitable?
u Was the sample preserved correctly?
u Was the holding time exceeded?
u Was the sample stored at the correct temperature?
u Was the sample mixed properly before testing?
u Was filtration required or avoided according to the method?
Some parameters are more sensitive to time and handling than others. For example:
n pH can change due to temperature and carbon dioxide exchange.
n Chlorine can decrease during storage.
n Ammonia and nitrogen species can change due to biological activity.
n Turbidity can change due to settling.
n COD can be affected by sample heterogeneity and suspended solids.
If the sample was not properly handled, repeating the measurement on the same sample may not solve the problem. The sample itself may no longer represent the original water condition. For unstable parameters, repeating the same stored sample may only confirm the condition of the stored sample, not the original water condition at the sampling point.
Sixth, Check Dilution and Sample Preparation
Dilution is a common source of error, especially in wastewater testing. When a sample concentration is above the method range, dilution is often necessary. But dilution also introduces additional uncertainty. The lab should check:
u Was dilution required?
u Was the dilution factor correct?
u Was the pipette suitable for the volume used?
u Was the sample mixed before taking the aliquot?
u Was the dilution water clean?
u Was the final result multiplied by the correct factor?
u Was the diluted result still within the reliable measuring range?
For COD testing, dilution errors can be especially important because wastewater samples may contain suspended solids, oils, color, or unevenly distributed organic matter. A small pipetting error can become much larger after multiplication by the dilution factor. If the result is close to the limit and dilution was used, the dilution process should be carefully reviewed before making a final decision.
Seventh, Inspect the Cuvette and Optical Path
For photometers and spectrophotometers, the cuvette is part of the measurement system. Even if the instrument is stable, the result can still be affected by:
l fingerprints
l water droplets
l scratches
l bubbles
l suspended particles
l stains
l wrong cuvette orientation
l incomplete cleaning
l inconsistent sample volume
These issues may seem small, but they can matter when the result is close to the limit. Before accepting a near-limit result, the operator should check whether the cuvette was clean, properly filled, free of bubbles, and placed consistently. In routine testing, cuvette handling is often one of the simplest but most important quality-control steps.
Eighth, Consider Matrix Interference
Water samples are not always simple. Industrial wastewater, municipal wastewater, aquaculture water, process water, and environmental water may contain substances that interfere with the test method. Matrix interference may come from:
l color
l turbidity
l suspended solids
l high salinity
l chlorine
l oxidizing or reducing agents
l metals
l organic compounds
l high hardness
l high chloride
l unusual pH
A method may work well in clean standard solutions but behave differently in a complex sample matrix. This is why a near-limit result should be interpreted with the sample matrix in mind.
If interference is suspected, the lab may need to use:
ü sample blank correction
ü dilution
ü standard addition
ü spike recovery
ü alternative method confirmation
ü filtration, if method-approved
ü matrix-matched quality control
The goal is not only to repeat the test, but to understand whether the sample matrix is affecting the result.
Ninth, Repeat the Test — But With a Clear Purpose
Repeating a near-limit result can be useful, but repeat testing should not be done blindly. If the same operator repeats the same procedure, using the same reagent, same blank, same dilution, and same sample condition, the second result may simply repeat the same error. Before repeating the test, the lab should decide what the repeat test is meant to confirm.
For example:
n Repeat with a fresh aliquot to check sample homogeneity.
n Repeat with a fresh blank to check blank contribution.
n Repeat with a new reagent lot to check reagent performance.
n Repeat with a different dilution to check range suitability.
n Repeat with a QC standard to check method performance.
n Repeat by another trained operator to check operational consistency.
Repeat testing should be part of a controlled investigation, not just a way to feel more confident about a number.
Tenth, Use QC Samples to Support the Decision
When the result is close to the limit, QC samples become especially important. Useful QC checks may include:
ü calibration verification standard
ü second-source standard
ü method blank
ü duplicate sample
ü spiked sample
ü control sample
ü low-level and high-level check standards
A second-source standard is particularly valuable because it can help confirm that the calibration and reagent system are not giving a false sense of accuracy. Duplicate testing can help evaluate repeatability. Spike recovery can help reveal matrix interference. A method blank can show whether the testing system has background contamination.
Together, these checks help answer the key question: Is the testing system reliable enough to support this decision?
A Practical Checklist for Near-Limit Water Test Results
When a water test result is close to the limit, the lab can review the following checklist before accepting the result:
1.Method range
Is the result within the reliable measuring range?
2.Calibration
Was calibration current, suitable, and properly verified?
3.Verification level
Was verification performed near the decision limit?
4.Blank
Was the blank acceptable and correctly applied?
5.Reagents
Were reagents valid, properly stored, and correctly used?
6.Reaction conditions
Were timing, temperature, mixing, and digestion conditions correct?
7.Sample handling
Was the sample collected, preserved, stored, and tested properly?
8.Dilution
Was the dilution factor correct and appropriate?
9.Cuvette condition
Was the optical path clean and consistent?
10.Matrix interference
Could the sample matrix affect the result?
11.Repeat testing
Was repeat testing performed with a clear quality-control purpose?
12.QC evidence
Do QC samples support the reliability of the result?
This checklist helps the lab move from simple measurement to reliable decision-making.
Near-Limit Results Should Be Reported With Context
For routine water testing, a number alone may not be enough when the result is close to the limit. The result should be interpreted together with:
l method used
l measuring range
l sample condition
l QC result
l dilution factor
l uncertainty or repeatability
l laboratory acceptance criteria
l regulatory or process decision requirement
This does not mean every result needs a long explanation. But for critical results, especially those close to compliance limits, the lab should have enough quality-control evidence to support the decision. A near-limit result should not be treated as a simple pass or fail without checking the testing process behind it.
FAQ
1. What does a near-limit water test result mean?
A near-limit result means the measured value is very close to a regulatory, process, or internal control limit. Small errors from calibration, blank correction, dilution, reagent quality, or sample handling may change the final decision.
2. Should a lab automatically repeat a water test result close to the limit?
Not always. The lab should first check the method range, calibration verification, blank result, reagent condition, sample handling, dilution process, and QC evidence. Repeat testing is useful only when it is done with a clear purpose.
3. Why is calibration verification important for near-limit results?
Calibration verification confirms whether the testing system is still producing reliable results. For near-limit samples, verification near the decision limit is more useful than verification only at a midpoint concentration.
4. Can blank error affect water test results close to the limit?
Yes. A small blank error can significantly affect low-level or near-limit results, especially in photometric tests such as ammonia, phosphate, nitrate, nitrite, chlorine, and COD.
5. Why can two laboratories get different results for the same water sample?
Different results may come from sample handling, holding time, preservation, calibration standards, reagent lots, dilution, matrix interference, method range, or operator technique.
6. What QC checks are useful for near-limit water test results?
Useful QC checks include calibration verification standards, second-source standards, method blanks, duplicate samples, spiked samples, control samples, and low-level or high-level check standards.
Conclusion
In routine water testing, a result close to the limit deserves more attention than an ordinary result. The laboratory should not immediately accept the number, reject the sample, or blame the instrument.
Instead, it should first check the testing system:
u Is the method suitable?
u Is the calibration verified?
u Is the blank acceptable?
u Are the reagents working properly?
u Was the sample handled correctly?
u Was dilution performed accurately?
u Is there possible matrix interference?
u Do QC samples support the result?
A reliable water test result is not only produced by an instrument. It is produced by a controlled testing workflow.
When the result is close to the limit, the most important question is not: “What number did the instrument show?”
The most important question is: “Is the whole testing process reliable enough to support the decision?”
In practical laboratory work, near-limit results should be reviewed according to the laboratory’s own SOP, method requirements, QC acceptance criteria, and applicable regulatory standards. The purpose is not to make the result higher or lower, but to make sure the reported result is technically defensible and suitable for decision-making.